

To sew a tiered skirt, measure and cut fabric into tiers, then sew them together. Attach an elastic waistband and hem the bottom.
A tiered skirt is a fun, versatile piece that adds flair to any wardrobe. Crafting one involves simple sewing techniques, making it a great project for beginners. Start by gathering your materials: fabric, elastic, scissors, and a sewing machine. Choose fabrics that flow nicely, such as cotton or linen.
Measure your waist and desired skirt length to determine tier dimensions. Cut fabric into strips for each tier, ensuring each layer is wider than the one above. Sew the tiers together, attach an elastic waistband, and finish with a hem. This step-by-step process results in a stylish, custom-fit skirt.

Credit: m.youtube.com
Materials Needed
Creating a tiered skirt is a fun and rewarding sewing project. To get started, you need the right materials. This section covers everything you need to sew a beautiful tiered skirt.
Fabric Choices
Choosing the right fabric is crucial for your tiered skirt. Here are some popular options:
- Cotton: Easy to sew and comfortable to wear.
- Chiffon: Light and airy, perfect for summer skirts.
- Denim: Durable and great for casual skirts.
Essential Tools
You’ll need some basic tools to sew your tiered skirt. Here is a list of essential items:
- Sewing Machine: For stitching the fabric together.
- Fabric Scissors: To cut the fabric accurately.
- Measuring Tape: To measure your fabric and your body.
- Pins and Needles: To hold the fabric in place and for hand sewing.
- Thread: Choose a color that matches your fabric.
With these materials, you’re ready to start sewing your tiered skirt. Make sure to gather everything before you begin. Happy sewing!
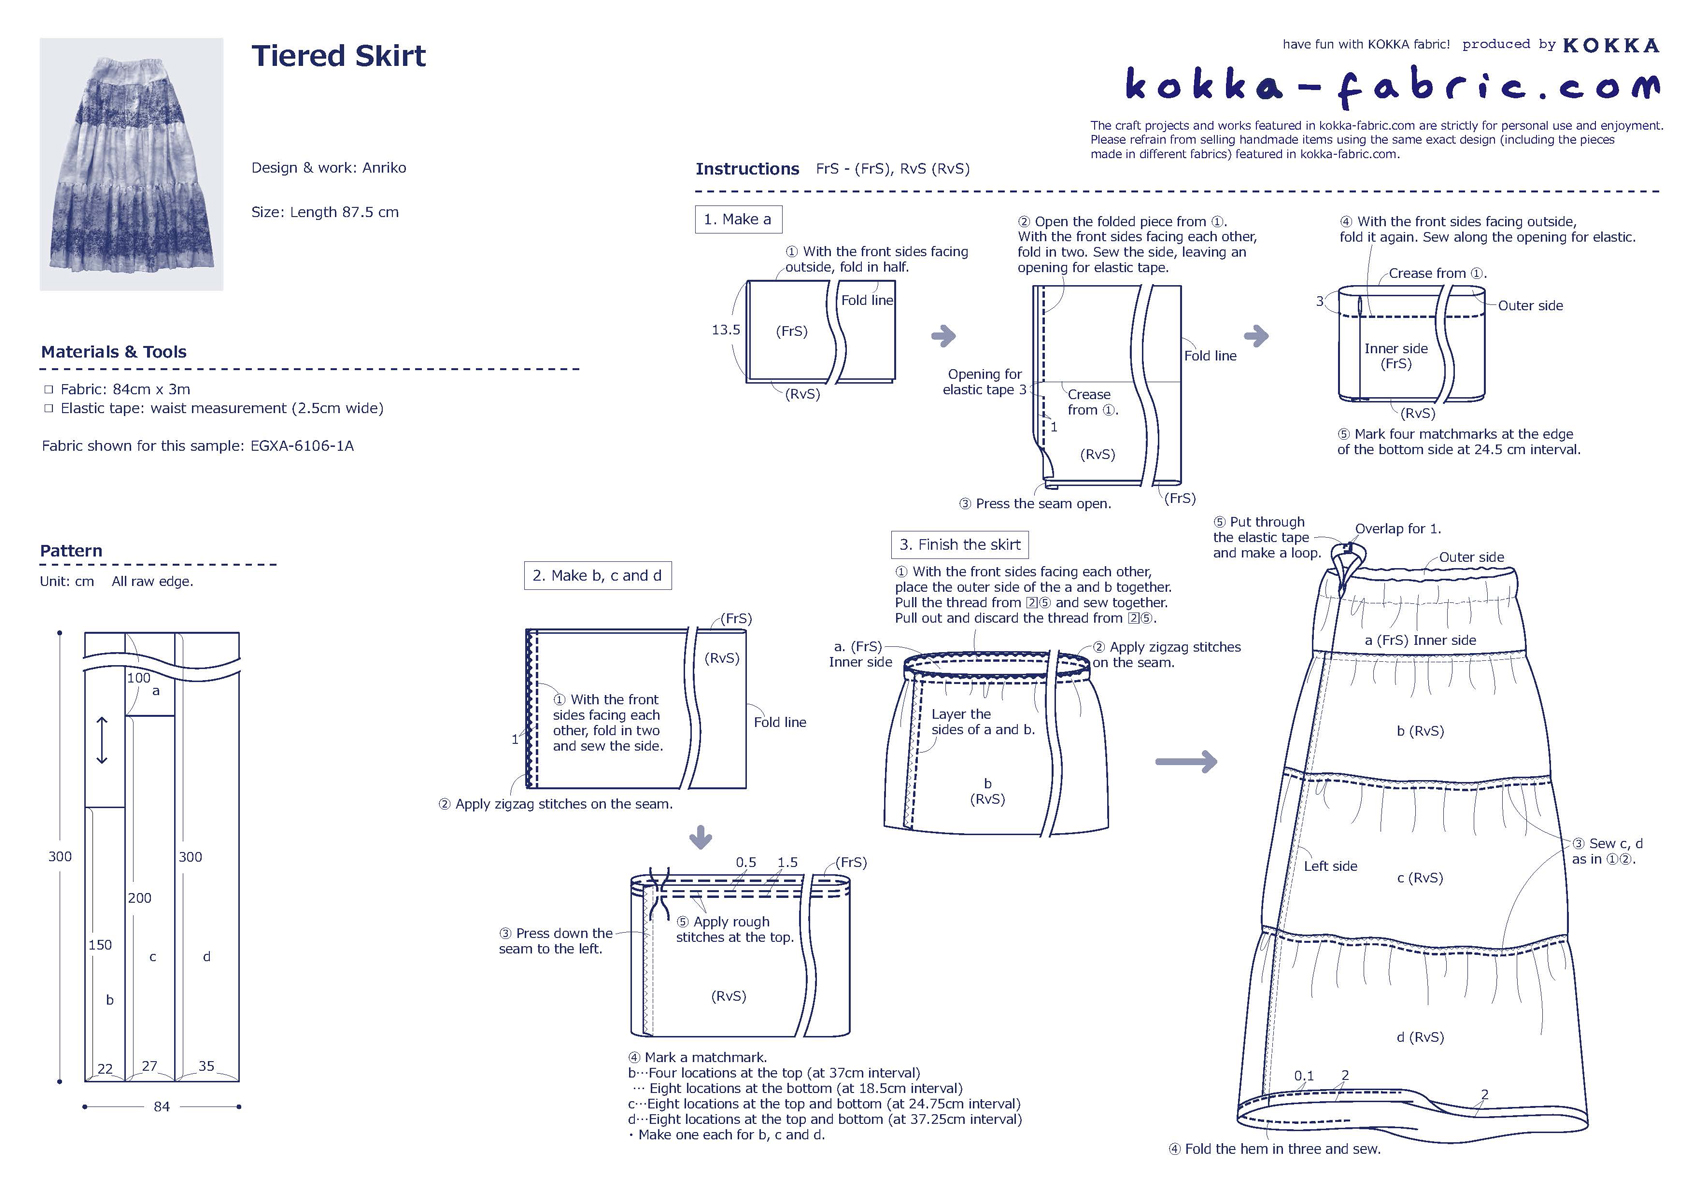
Credit: kokka-fabric.com
Taking Measurements
Before you start sewing your tiered skirt, taking accurate measurements is crucial. This ensures a perfect fit and a flattering look. Below, you’ll find step-by-step guides to measure your waist and determine the length of your skirt.
Waist Measurement
First, measure your waist. Use a flexible measuring tape.
Wrap the tape around your natural waistline. The waistline is the narrowest part of your torso, usually above your belly button.
Ensure the tape is snug but not too tight. Write down the measurement in inches or centimeters.
Length Of Skirt
Decide how long you want your skirt to be. Measure from your waist to the desired length.
Use a measuring tape and stand straight. Hold the tape at your waist and let it drop to the desired length.
Write down this measurement. This will help you cut your fabric accurately.
| Measurement Type | Instructions |
|---|---|
| Waist | Measure around the narrowest part of your waist. |
| Length | Measure from your waist down to your desired skirt length. |
With these measurements, you’re ready to cut your fabric and start sewing your tiered skirt. Accurate measurements ensure your skirt fits perfectly and looks great.
Cutting The Fabric
Before you start sewing, cutting the fabric correctly is crucial. Each tier of the skirt requires different measurements. This section will guide you through the steps to cut the fabric for each tier properly.
Top Tier
The top tier is the smallest tier. Measure your waist and add an extra inch for seam allowance. The length of this tier should be around 1/3 of the skirt’s total length. Use a fabric marker to draw the measurements on the fabric. Cut the fabric carefully along the lines.
Middle Tier
The middle tier is a bit wider. Measure the width to be 1.5 times the waist measurement. The length should be around 1/3 of the skirt’s total length. Mark the fabric with these measurements. Use sharp scissors to ensure a clean cut.
Bottom Tier
The bottom tier is the widest. Measure the width to be twice the waist measurement. The length of this tier should be the remaining 1/3 of the skirt’s total length. Mark the fabric and cut it carefully.
Here’s a quick reference table for the measurements:
| Tier | Width | Length |
|---|---|---|
| Top Tier | Waist + 1 inch | 1/3 of skirt length |
| Middle Tier | 1.5 times Waist | 1/3 of skirt length |
| Bottom Tier | 2 times Waist | 1/3 of skirt length |
Double-check the measurements before cutting. This ensures accuracy and helps avoid fabric waste.
Sewing The Tiers
Sewing a tiered skirt involves creating multiple layers, or tiers, of fabric. Each tier is gathered and then attached to the one above. This creates a beautiful, flowing look. Let’s dive into the specifics of gathering fabric and attaching tiers.
Gathering Fabric
Gathering fabric is an essential step for creating a tiered skirt. It helps in giving volume to each tier. To gather fabric, follow these simple steps:
- Set your sewing machine to the longest stitch length.
- Sew two parallel lines of stitching along the top edge of your fabric.
- Leave long thread tails at the beginning and end.
- Hold the bobbin threads and gently pull to gather the fabric.
- Adjust the gathers so the fabric fits the width of the tier above.
Make sure the gathers are even. This ensures a neat and balanced look.
Attaching Tiers
After gathering the fabric, it’s time to attach the tiers. This step involves sewing the gathered edge to the bottom edge of the tier above. Follow these steps:
- Place the gathered edge of the fabric right side up.
- Align it with the bottom edge of the tier above, right sides together.
- Pin the gathered fabric to the tier above.
- Sew along the pinned edge with a straight stitch.
- Remove the pins as you sew.
- Press the seam upwards towards the top tier.
Repeat these steps for each tier. This process creates the beautiful layered look of a tiered skirt.
Creating The Waistband
Creating the waistband is a crucial step in sewing a tiered skirt. The waistband ensures a snug and comfortable fit. This section will guide you through measuring, cutting, and attaching the waistband.
Measuring And Cutting
First, measure your waist with a measuring tape. Write down the measurement. Add one inch for seam allowance.
For example, if your waist measures 30 inches, cut the waistband fabric to 31 inches. The width of the waistband should be 4 inches. This allows for a double-fold and seam allowance.
Here’s a quick reference table:
| Measurement | Value |
|---|---|
| Waist | 30 inches |
| Seam Allowance | 1 inch |
| Total Length | 31 inches |
| Width | 4 inches |
Attaching To Skirt
Fold the waistband fabric in half lengthwise. The right sides should be together. Sew along the open edge to form a loop.
Align the waistband with the top edge of the skirt. Pin it in place, matching the seams. Sew the waistband to the skirt, leaving a small gap for the elastic.
Steps to attach the waistband:
- Fold the waistband in half lengthwise.
- Sew along the open edge.
- Align the waistband with the skirt.
- Pin the waistband in place.
- Sew, leaving a gap for the elastic.
Finally, insert the elastic through the gap. Sew the ends of the elastic together. Close the gap with a few stitches.
Adding A Zipper
Adding a zipper to your tiered skirt can seem tricky. But with the right steps, it’s easy. Follow these simple instructions to get a clean, professional finish.
Choosing The Right Zipper
First, choose the correct zipper for your skirt. A standard dress zipper works well.
| Fabric Type | Recommended Zipper |
|---|---|
| Cotton | Standard Dress Zipper |
| Denim | Heavy-Duty Zipper |
| Silk | Invisible Zipper |
Measure the opening where the zipper will go. Make sure the zipper is 1 inch longer than this opening.
Sewing The Zipper
Now, it’s time to sew the zipper. Follow these steps:
- Pin the zipper: Align the zipper with the opening. Pin it in place.
- Baste the zipper: Use a long stitch to hold the zipper temporarily.
- Sew the zipper: Switch to a zipper foot. Sew along the edges of the zipper.
- Remove basting stitches: Carefully take out the temporary stitches.
Check to ensure the zipper moves smoothly.
With these steps, your skirt will have a neat zipper. Happy sewing!
Hemming The Skirt
Hemming is a crucial step in finishing your tiered skirt. A well-done hem makes the skirt look polished and professional. Below, we will guide you through the simple steps of preparing and sewing the hem.
Preparing The Hem
Begin by laying your skirt flat on a table. Ensure the fabric is smooth and wrinkle-free. Next, measure the desired hem length. Use a ruler or measuring tape for accuracy. Mark the hemline with fabric chalk or a washable marker.
- Lay the skirt flat
- Measure the hem length
- Mark the hemline
Fold the fabric up to the marked line. Use pins to secure the fold in place. Press the fold with an iron to create a crisp edge. This makes sewing easier and more precise.
Sewing The Hem
Set your sewing machine to a straight stitch. Begin sewing along the folded edge. Use a matching thread color for a seamless look. Sew slowly to ensure the stitches are even.
- Set the machine to a straight stitch
- Sew along the folded edge
- Ensure stitches are even
After sewing, remove the pins carefully. Press the hem again with an iron. This final press will set the stitches and give your skirt a clean finish.
Congratulations! Your hem is now complete, and your tiered skirt is ready to wear.
Finishing Touches
The last steps in sewing a tiered skirt bring your project to life. Finishing touches make your skirt look polished and professional. Let’s dive into the details.
Ironing The Skirt
Ironing is crucial for a neat finish. Set your iron to the appropriate temperature for your fabric. Press each seam flat to ensure smooth lines and even tiers.
For best results, use a pressing cloth. This prevents shiny marks on your fabric. Iron all layers of the skirt. Pay special attention to the hem and waistband.
Adding Embellishments
Embellishments add a personal touch to your skirt. You can use ribbons, lace, or buttons. Choose embellishments that complement your fabric and style.
Here are some ideas for embellishing your tiered skirt:
- Ribbons: Sew ribbons along the seams or hems for a playful look.
- Lace: Add lace trim to the edges for a delicate touch.
- Buttons: Place decorative buttons along the waistband or tiers.
Make sure to secure all embellishments properly. This ensures they stay in place with wear.
Credit: weallsew.com
Conclusion
Crafting a tiered skirt can be a rewarding project. Follow the steps carefully for beautiful results. Practice makes perfect, so keep sewing and improving. Share your creations with friends and family. Enjoy the process and wear your handmade skirt with pride.
Happy sewing!


Leave a Reply