
To make ribbon skirts, gather materials like fabric, ribbons, and sewing tools. Follow a pattern to cut and sew.
Ribbon skirts are traditional garments often worn at cultural events and celebrations. They hold significant meaning in many Indigenous communities, symbolizing heritage and identity. Creating a ribbon skirt involves choosing vibrant fabrics and coordinating ribbons to create beautiful, flowing designs.
The process is relatively simple but requires careful attention to detail for a polished finish. Beginners can follow step-by-step tutorials to master the basics of cutting, pinning, and sewing. With practice, crafting a ribbon skirt becomes an enjoyable and rewarding experience, allowing you to express creativity and cultural appreciation.
Materials Needed
Creating ribbon skirts is a delightful and rewarding craft. The right materials are crucial for a beautiful and durable skirt. Here’s a guide to the materials needed.
Fabric Selection
Choosing the right fabric is the first step. Opt for cotton or polyester. These fabrics are easy to work with. They also provide comfort and durability.
| Fabric Type | Advantages |
|---|---|
| Cotton | Soft, breathable, easy to sew |
| Polyester | Durable, wrinkle-resistant, vibrant colors |
Ribbon Types
Ribbons add color and flair to your skirt. Choose ribbons that complement your fabric. Satin and grosgrain are popular options.
- Satin Ribbons: Smooth and shiny.
- Grosgrain Ribbons: Sturdy with a ribbed texture.
Ensure the ribbons are colorfast. This prevents bleeding during washing.
Additional Supplies
Gather these additional supplies for your project:
- Measuring Tape: For accurate measurements.
- Scissors: Sharp scissors for clean cuts.
- Thread: Matching thread for sewing.
- Sewing Machine: Speeds up the sewing process.
- Pins: To hold the fabric in place.
- Iron: For pressing seams and ribbons.
Having the right supplies ensures a smooth crafting experience.
Credit: www.etsy.com
Design Planning
Design planning is the first and crucial step in making ribbon skirts. It involves choosing the right patterns, sketching your design, and gathering materials. Proper planning ensures your skirt turns out beautifully.
Choosing Patterns
Choosing the right pattern is essential. Patterns can be simple or complex. For beginners, simple patterns work best.
| Pattern Type | Difficulty Level |
|---|---|
| Floral | Easy |
| Geometric | Medium |
| Abstract | Hard |
Choose patterns that match your style. You can mix and match different patterns. This adds uniqueness to your skirt. Always use high-quality fabric for better results.
Sketching Your Design
Sketching your design helps in visualizing the final product. Start with a simple sketch. Use colored pencils to represent different ribbons.
- Draw the outline of your skirt.
- Add details like ribbons and patterns.
- Use colors to differentiate each ribbon.
Keep your sketch handy while working. This ensures you follow your design accurately. Also, consider the length and width of the skirt. Proper measurements lead to a perfect fit.
Measuring And Cutting
The process of making a ribbon skirt starts with measuring and cutting. Precise measurements ensure your ribbon skirt fits well. Proper cutting minimizes fabric waste and errors.
Taking Measurements
Before cutting, gather all your tools. You’ll need a measuring tape, a notebook, and a pen.
Waist Measurement: Wrap the tape around your waist. Write down the number in inches.
Hip Measurement: Measure the fullest part of your hips. Record this measurement as well.
Length: Measure from your waist to your desired skirt length. This is usually to the knee or mid-calf. Note this measurement too.
Use these measurements to create a pattern. This ensures accuracy.
Cutting The Fabric
Prepare your fabric on a flat surface. Smooth out any wrinkles.
- Place your pattern on the fabric.
- Pin the pattern to keep it steady.
- Use fabric scissors for a clean cut.
Cutting Tips:
- Always cut on a flat surface.
- Use sharp scissors for clean edges.
- Double-check your measurements before cutting.
Now, your fabric pieces are ready for sewing. Follow these steps for a well-fitting skirt.

Credit: www.youtube.com
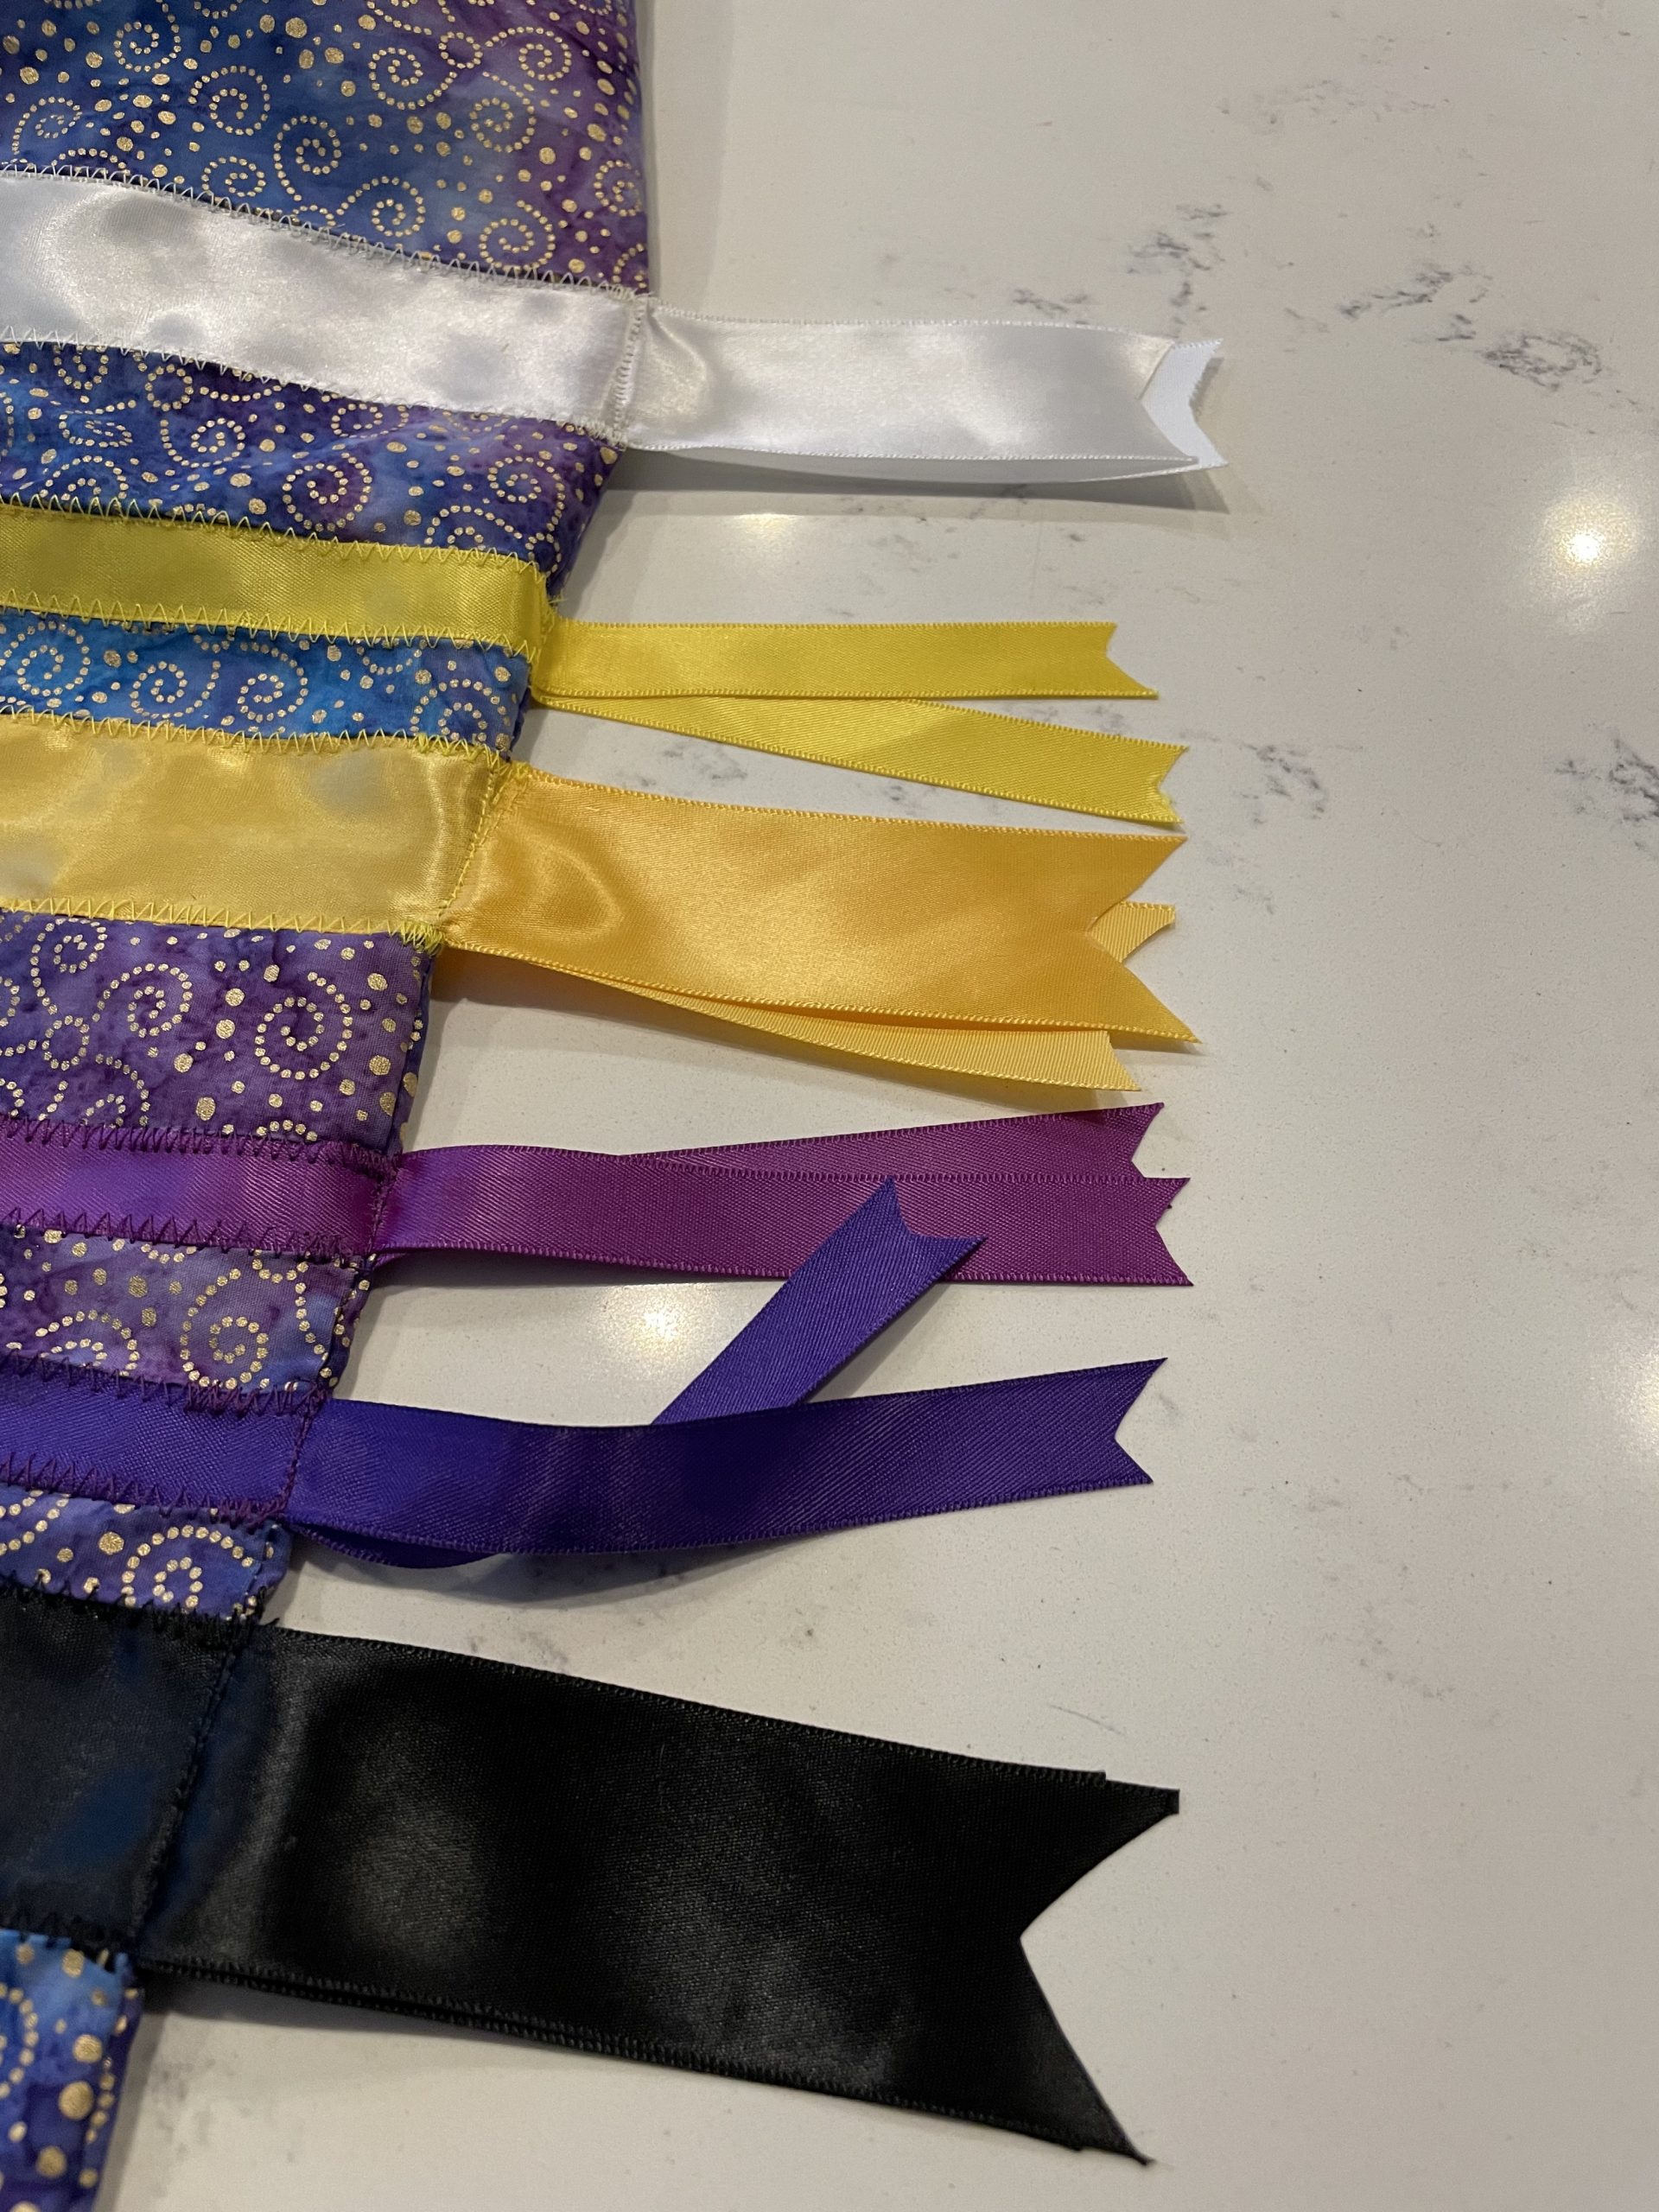
Preparing The Ribbons
Preparing the Ribbons is a vital step in making beautiful ribbon skirts. This step ensures your ribbons are the right length and their edges are sealed to prevent fraying. Follow these simple steps to prepare your ribbons perfectly.
Cutting Ribbons To Length
To start, measure the length needed for each ribbon. Use a ruler or measuring tape for accuracy.
Place the ribbon on a flat surface. Hold it firmly, and then cut it straight using sharp scissors.
Tip: Cut a few extra inches to allow for adjustments later.
Sealing Ribbon Edges
Sealing the edges prevents them from fraying. There are several methods to seal ribbon edges:
- Heat Sealing: Use a lighter or candle. Gently pass the ribbon edge through the flame. Be careful not to burn the ribbon.
- Fray Check: Apply a small amount of fray check liquid to the edges. Let it dry completely.
- Sewing: Use a zigzag stitch along the edge to prevent fraying.
Choose the method that works best for you. Always ensure the edges are sealed properly.
Preparing the ribbons might seem tedious, but it ensures your ribbon skirt looks neat and lasts longer.
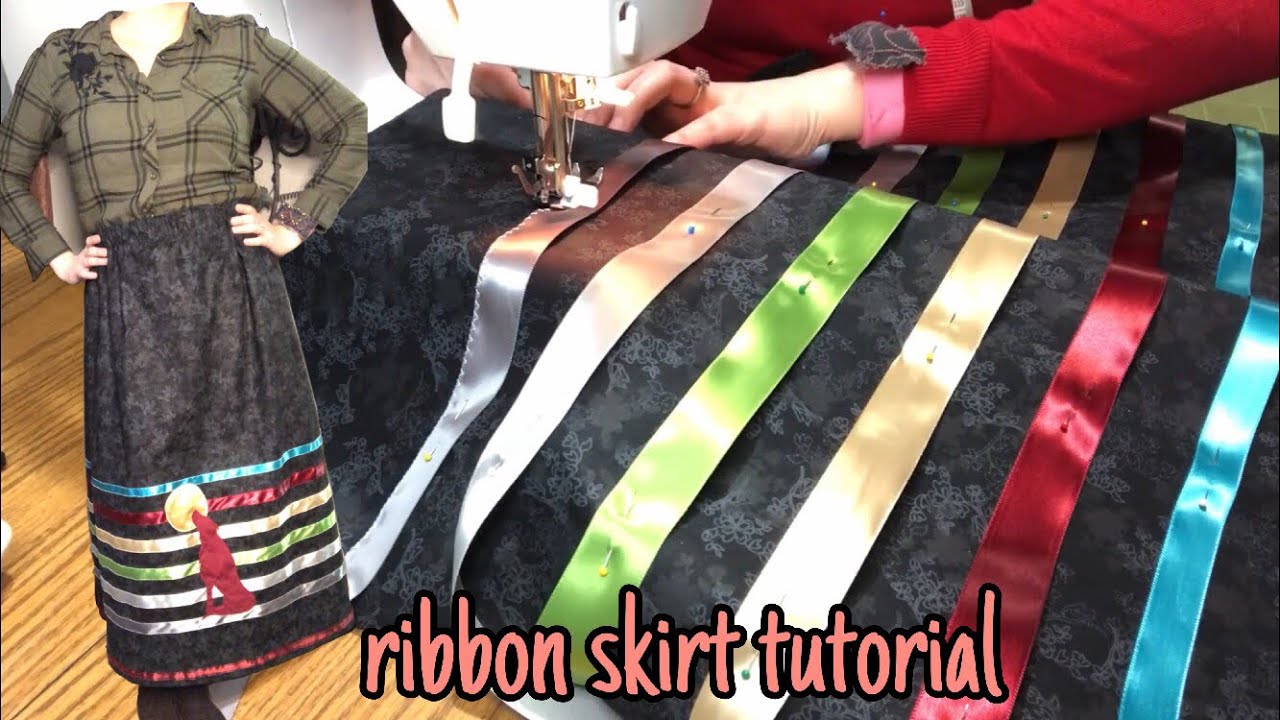
Attaching The Ribbons
Attaching ribbons to your skirt is an exciting step. It brings color and life to your project. This section will guide you through the process. You’ll learn how to pin and sew ribbons in place.
Pinning Ribbons In Place
First, gather your materials. You need ribbons, pins, and a measuring tape. Lay your skirt flat on a clean surface. Decide where you want the ribbons to go.
Measure and mark the spots for the ribbons. Use the measuring tape to ensure even spacing. You can mark these spots with chalk or fabric markers.
Next, cut the ribbons to the desired length. Add an extra inch for folding the edges. Position the ribbons on the skirt. Use pins to secure them in place. Make sure the ribbons are straight and aligned.
Sewing Techniques
Start with a simple straight stitch. This is the easiest way to sew ribbons. Set up your sewing machine with matching thread.
Begin sewing at one end of the ribbon. Use a slow and steady pace. Sew along the edge of the ribbon. Repeat this on the other side of the ribbon.
For a stronger hold, use a zigzag stitch. This technique is great for thicker ribbons. Adjust your sewing machine to the zigzag setting. Sew along the edges of the ribbon with care.
If you prefer hand sewing, use a backstitch. This stitch is strong and durable. Thread your needle and tie a knot at the end. Sew along the edge of the ribbon, making small, even stitches.
| Technique | Best For | Instructions |
|---|---|---|
| Straight Stitch | Basic Ribbons | Use a straight line to sew ribbons |
| Zigzag Stitch | Thicker Ribbons | Sew in a zigzag pattern along edges |
| Backstitch (Hand Sewing) | Any Ribbons | Hand sew with small, even stitches |
By following these steps, you can attach ribbons easily. Your ribbon skirt will look beautiful and unique.
Assembling The Skirt
Once all your fabric pieces are ready, it’s time to assemble your ribbon skirt. This part includes sewing the panels together and adding a waistband. Let’s dive into each step to ensure your skirt comes together perfectly.
Sewing Panels Together
First, lay out all your cut fabric panels. Ensure the patterns and colors match up.
Steps to Sew Panels:
- Place two fabric panels together, right sides facing.
- Pin the edges to keep the fabric in place.
- Sew along the pinned edge with a straight stitch.
- Repeat with the remaining panels until all are joined.
- Press the seams open to make them flat.
Tips:
- Use a 1/2 inch seam allowance.
- Ensure your stitches are even and secure.
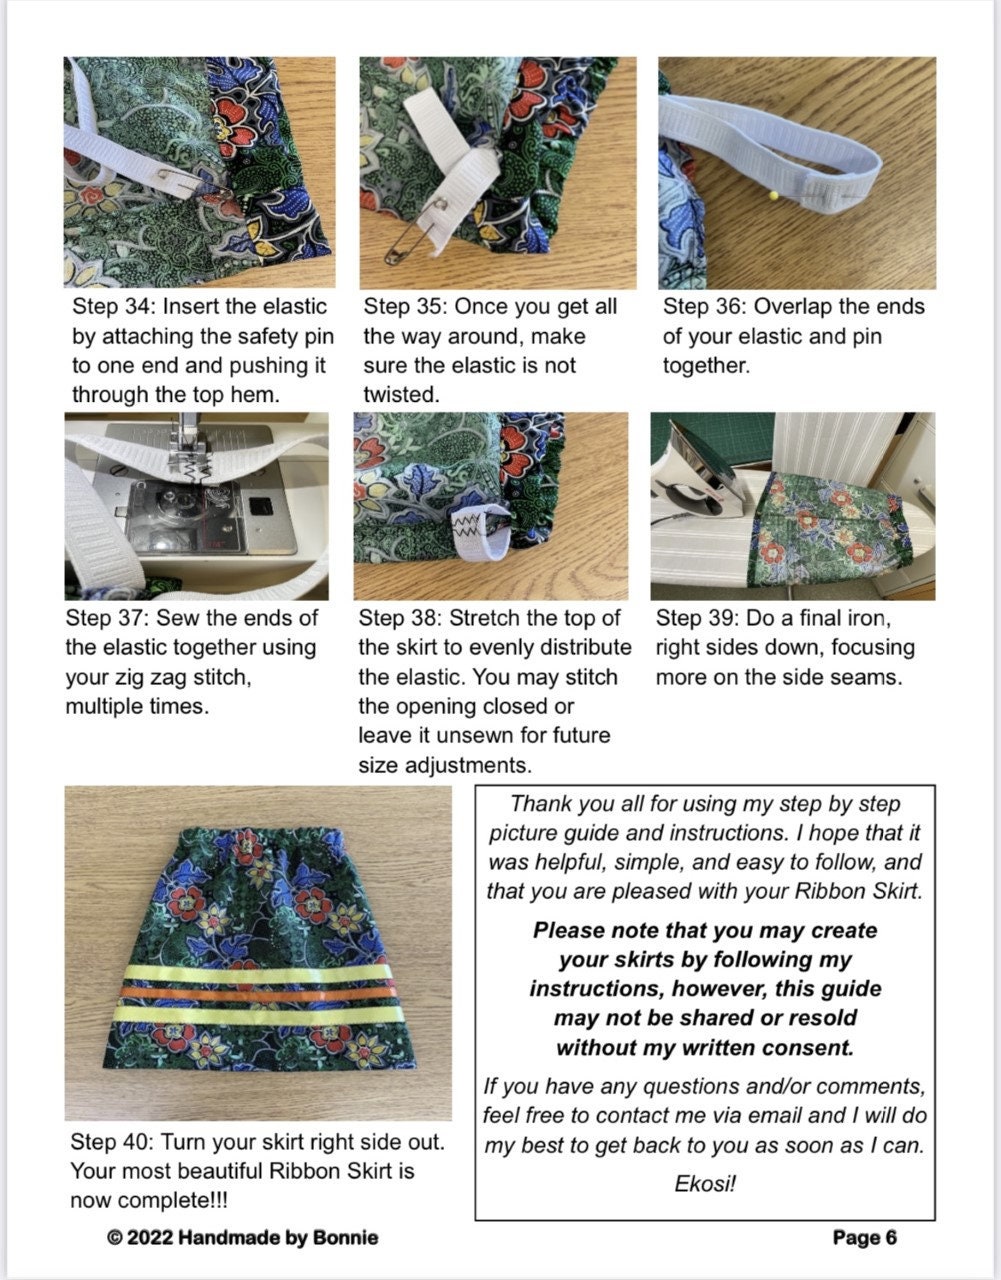
Adding A Waistband
Now, it’s time to add a waistband to your skirt. This will provide a neat finish and secure fit.
Steps to Add Waistband:
- Measure your waist and cut a fabric strip accordingly.
- Fold the strip in half lengthwise and press.
- Pin the folded strip to the top edge of the skirt.
- Sew the waistband to the skirt using a straight stitch.
- Leave a small opening to insert elastic or a drawstring.
- Thread the elastic or drawstring through the waistband.
- Close the opening with a final stitch.
Tips:
- Ensure the waistband is slightly wider than your elastic.
- Check the fit before closing the opening.
Finishing Touches
The final steps in making ribbon skirts involve adding the finishing touches. These details make your skirt stand out. They add charm and personality. Let’s explore two key areas: hemming the skirt and adding decorative elements.
Hemming The Skirt
Hemming the skirt ensures a clean and polished look. Follow these steps for a perfect hem:
- First, measure the skirt length. Mark where you want the hemline.
- Next, fold the fabric up to the marked line. Use pins to hold it in place.
- Then, press the folded edge with an iron. This helps create a sharp crease.
- Stitch along the folded edge. Use a matching thread for a seamless look.
Your hem should look neat and even. This small detail makes a big difference.
Adding Decorative Elements
Adding decorative elements enhances your ribbon skirt. Consider these options:
- Ribbons: Sew additional ribbons in contrasting colors.
- Lace: Attach lace trim to the hem or waistband.
- Beads: Embellish the skirt with beads for sparkle.
- Embroidery: Add embroidered designs for a personal touch.
Each element adds unique flair to your skirt. Choose what reflects your style.
Here’s a simple table to summarize:
| Decorative Element | Description |
|---|---|
| Ribbons | Sew extra ribbons in vibrant colors. |
| Lace | Attach lace trims for a delicate look. |
| Beads | Use beads to add a touch of sparkle. |
| Embroidery | Incorporate embroidered patterns for uniqueness. |
These finishing touches make your ribbon skirt special. They showcase your creativity and craftsmanship.
Caring For Your Skirt
Caring for Your Skirt is essential to maintain its beauty and longevity. Proper care ensures your ribbon skirt stays vibrant and in good shape. Follow these simple steps to keep your skirt looking new for years.
Washing Instructions
Always check the fabric label before washing your ribbon skirt. Most ribbon skirts are delicate and require gentle care.
- Hand Wash: Fill a basin with cold water and mild detergent. Submerge the skirt and gently swirl it around. Rinse with cold water until the detergent is gone.
- Machine Wash: Use a gentle cycle with cold water. Place the skirt in a mesh laundry bag to protect the ribbons.
- Avoid Bleach: Bleach can damage the fabric and colors. Stick to gentle detergents.
Storage Tips
Proper storage prevents damage and keeps your skirt looking fresh.
- Hang It Up: Use a padded hanger to avoid creases and maintain shape.
- Avoid Direct Sunlight: Store in a cool, dark place to prevent fading.
- Keep Away from Moisture: Moisture can cause mold and mildew. Use a dry, well-ventilated area.
Follow these tips to ensure your ribbon skirt remains a cherished piece in your wardrobe.
Credit: www.strongwagner.com
Conclusion
Creating your own ribbon skirt can be a rewarding experience. It allows for personal expression and creativity. Follow the steps outlined to craft a unique piece. Share your creations with loved ones. Enjoy the process and embrace the tradition. Happy sewing!


Leave a Reply