
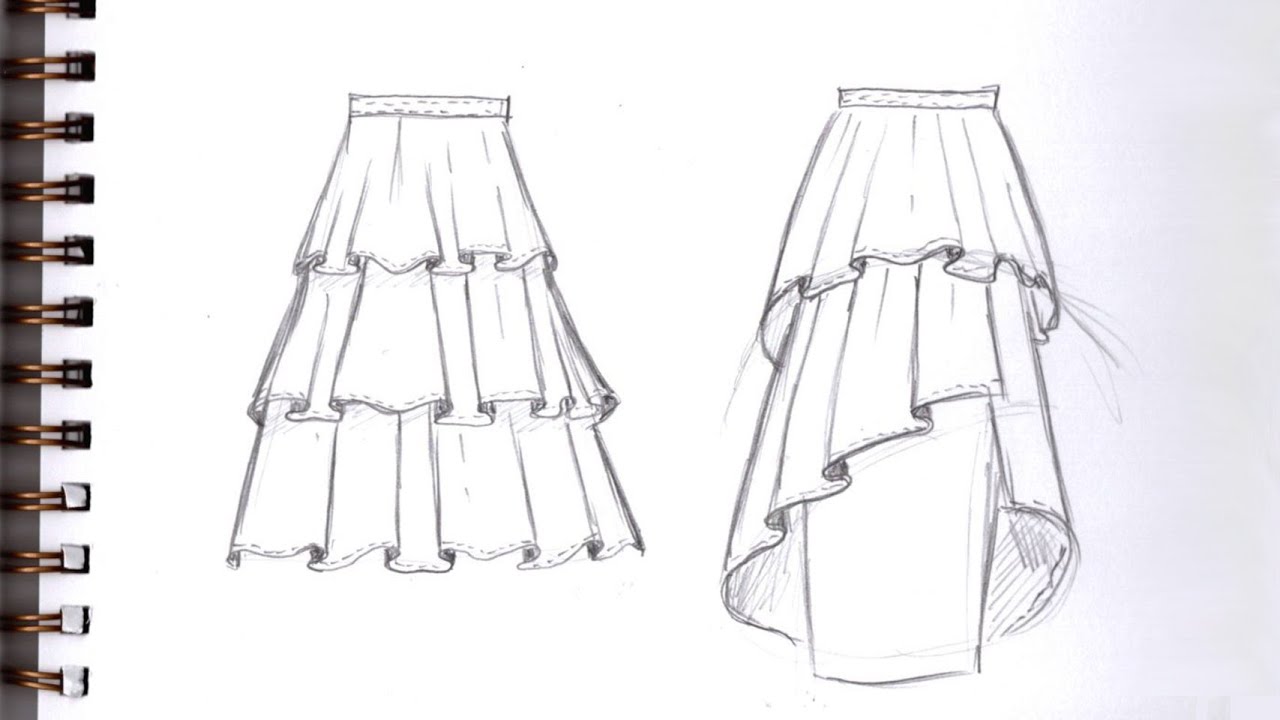
To draw a ruffle skirt, start by sketching the waistband. Then, add layers of wavy lines for the ruffles.
A ruffle skirt adds a playful and stylish touch to any outfit. Drawing one can seem challenging, but breaking it into steps simplifies the process. Begin with a simple waistband to anchor your design. Next, create the ruffles by drawing wavy lines that overlap each other.
Focus on the natural flow and curvature to mimic real fabric. Use light pencil strokes to adjust and refine as needed. Add shading to give depth and a realistic appearance. Whether you’re an aspiring fashion designer or just love to sketch, these steps will help you create a beautiful ruffle skirt illustration.
Credit: www.clipstudio.net
Materials Needed
To draw a ruffle skirt, you’ll need some essential materials. These tools will help you achieve a professional look. Let’s explore them under two main categories: Sketching Tools and Fabric References.
Sketching Tools
Having the right sketching tools is crucial for drawing a ruffle skirt. Below is a list of items you’ll need:
- Pencils: Use HB and 2B pencils for different shades.
- Erasers: Get both a kneaded eraser and a regular one.
- Paper: High-quality drawing paper is essential.
- Ruler: A ruler helps in drawing straight lines.
- Colored Pencils: Use these for adding color to your sketch.
Fabric References
Understanding fabric is crucial for drawing realistic ruffles. Here are some references you can use:
| Fabric Type | Description |
|---|---|
| Silk | Light and smooth, perfect for soft ruffles. |
| Cotton | Sturdy and easy to draw, ideal for beginners. |
| Chiffon | Sheer and flowy, great for delicate ruffles. |
Having fabric samples or pictures can aid your drawing. These references help you understand how the fabric behaves and folds.
Basic Skirt Shape
Creating a ruffle skirt starts with a basic skirt shape. This foundation helps in adding ruffles and details later. It is important to start with a simple base. Follow these steps to draw the perfect basic skirt shape.
Drawing The Waistband
The waistband is the top part of the skirt. It holds the skirt in place. Start by drawing a horizontal line. This line will be the top of your waistband.
- Make sure the line is straight.
- Draw it to the desired width of the skirt.
- This line should be centered on your paper.
Next, draw a second line parallel to the first one. This will be the bottom of the waistband. Connect both lines at the ends. Your waistband is now complete.
Creating The Hemline
The hemline is the bottom part of the skirt. Start by drawing a curved line from one end of the waistband. This line will go down and curve slightly outward.
- Draw the line to the desired length of the skirt.
- Ensure the curve is gentle and smooth.
- Repeat this on the other side of the waistband.
Connect both curved lines at the bottom. This creates the hemline of the skirt. Your basic skirt shape is now ready for adding ruffles.
Adding Ruffles
Adding ruffles to a skirt can transform it from plain to fabulous. This process requires careful planning and attention to detail. In this section, we will guide you through the steps of adding ruffles to your skirt drawing. Let’s get started!
Planning Ruffle Placement
Planning where to place the ruffles is crucial. Start by deciding how many ruffles you want. Consider the length of your skirt and how full you want it to look.
Create a rough sketch of your skirt. Mark the positions where you want each ruffle to go. Ensure the spacing is even and symmetrical. Use a light pencil to make adjustments easily.
Drawing Ruffle Layers
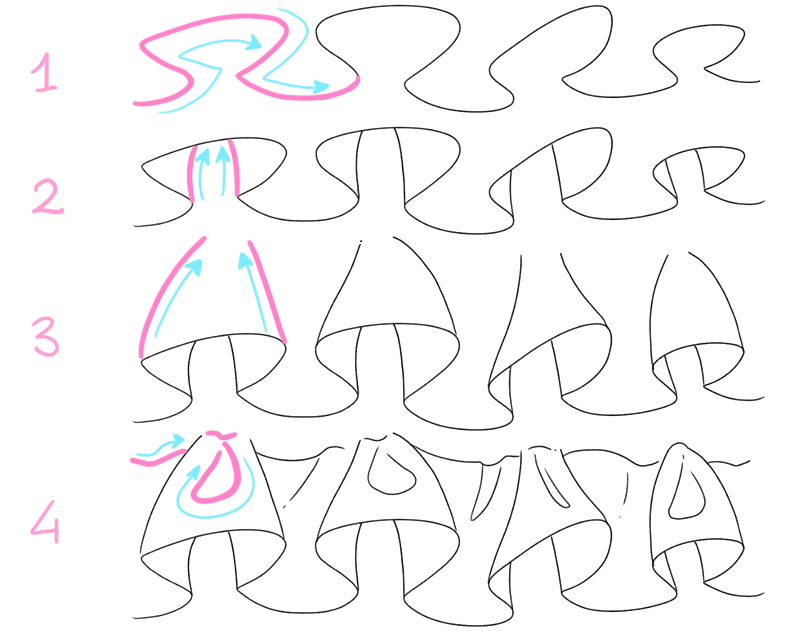
Begin by drawing the bottom ruffle first. This will be your base layer. Follow these simple steps:
- Draw a wavy line across the skirt at the marked position.
- Make sure the waves are consistent in size and shape.
- Add smaller waves within the larger waves to create texture.
Repeat the process for each ruffle layer. Draw each subsequent ruffle above the previous one. Keep the spacing even and the waves consistent.
To add depth, use shading techniques. Darken the areas where the ruffles overlap. Lighten the areas where the fabric is more exposed. This will give your drawing a realistic look.
| Step | Description |
|---|---|
| 1 | Draw the bottom ruffle first. |
| 2 | Ensure waves are consistent in size and shape. |
| 3 | Repeat for each ruffle layer, keeping spacing even. |
| 4 | Add shading for depth and texture. |
With these steps, you can create beautiful ruffle skirts. Practice makes perfect, so keep drawing and refining your technique.
Detailing The Ruffles
Detailing the ruffles on a skirt can bring your drawing to life. By adding texture and creating depth, your ruffle skirt will look more realistic and stylish. Let’s dive into the steps for detailing those ruffles.
Adding Texture
Adding texture to your ruffles can make them look more realistic. Here are some steps to follow:
- Sketch light lines to outline the ruffles.
- Draw small, curved lines along the edges.
- Vary the length of the lines to add interest.
- Shade areas where the ruffles overlap.
Use these techniques to create a fabric-like feel.
Creating Depth
Creating depth makes your ruffles look three-dimensional. Follow these steps:
- Add shadows beneath each ruffle layer.
- Use darker shades closer to the edges.
- Highlight the peaks of the ruffles with lighter colors.
Depth makes the ruffles appear more dynamic and lively.
| Step | Description |
|---|---|
| 1 | Sketch light lines for the ruffle outline. |
| 2 | Draw small, curved lines along edges. |
| 3 | Add shadows beneath each ruffle layer. |
| 4 | Highlight peaks with lighter colors. |
By following these steps, you can detail the ruffles effectively. This will make your drawing of a ruffle skirt stand out.
Shading Techniques
Mastering shading techniques can bring your ruffle skirt drawings to life. Shading adds depth, dimension, and a sense of realism. In this section, we’ll discuss how to effectively shade a ruffle skirt.
Light Source Considerations
Understanding the light source is crucial. It determines where shadows and highlights fall. Start by deciding the direction of the light. Is it coming from above, the side, or behind?
- If the light source is above, the top of the ruffles will be lighter.
- Side lighting will create shadows on one side of each ruffle.
- Backlighting will cast shadows towards the viewer.
Always keep the light source consistent throughout your drawing.
Creating Shadows
Shadows add realism to your ruffle skirt. Begin by identifying areas that would naturally be darker.
- Shade under each ruffle layer.
- Darken areas where ruffles overlap.
- Add subtle shadows along the folds.
Use a soft pencil or shading tool. Gradually build up the darkness. Avoid harsh lines; smooth transitions make shadows look more natural.
| Light Direction | Shadow Placement |
|---|---|
| Above | Under ruffles |
| Side | On one side of each ruffle |
| Behind | Towards the viewer |
With practice, your shading techniques will improve. Your ruffle skirts will look more realistic and engaging.

Credit: m.youtube.com
Coloring The Skirt
After sketching your ruffle skirt, the next exciting step is coloring. Coloring brings your design to life and adds personality to the skirt. Below, we will guide you through choosing a color palette and applying base colors.
Choosing A Color Palette
Choosing the right color palette sets the tone for your ruffle skirt. Here are some tips:
- Consider the season: Bright colors for summer, darker hues for winter.
- Think about the occasion: Pastels for casual wear, bold colors for parties.
- Match with accessories: Pick colors that complement shoes and bags.
Use a color wheel to find complementary colors. This ensures a harmonious look. Test different shades to see what works best.
Applying Base Colors
Start with the base colors. These are the main colors of your skirt. Follow these steps:
- Outline the skirt: Use a light pencil to outline your sketch.
- Fill in the base color: Use even strokes for a smooth look.
- Layer colors: Add layers for depth and richness.
For ruffles, use a slightly darker shade on the edges. This creates a shadow effect and adds dimension.
Finally, let your base colors dry completely. This prevents smudging and ensures a clean finish.
Final Touches
Congratulations! You’ve almost completed your ruffle skirt drawing. The final touches will bring your sketch to life. This section will guide you through highlighting and adding patterns to make your skirt truly stand out.
Highlighting
Highlighting adds depth and realism to your ruffle skirt drawing. Use a white pencil or eraser to create highlights. These highlights should be placed where the light naturally hits the fabric.
- Lightly shade the top edges of the ruffles.
- Add small highlights to the folds for a realistic look.
- Use soft strokes to blend the highlights smoothly.
Refer to the table below for different highlighting techniques:
| Technique | Tool | Effect |
|---|---|---|
| Soft Shading | White Pencil | Creates a subtle highlight |
| Erasing | Eraser | Removes graphite for bright highlights |
| Blending | Blending Stump | Smoothens transitions |
Adding Patterns
Patterns can add a unique touch to your ruffle skirt. Choose a pattern that complements the skirt’s style. Examples include polka dots, stripes, or floral designs.
- Draw the base pattern lightly with a pencil.
- Go over the pattern with a fine-tip pen or darker pencil.
- Ensure the pattern follows the folds and curves of the fabric.
Use the table below for pattern ideas:
| Pattern | Style |
|---|---|
| Polka Dots | Playful and fun |
| Stripes | Bold and classic |
| Floral | Elegant and feminine |
Adding these final touches will make your ruffle skirt drawing pop. Enjoy the process and have fun experimenting with highlights and patterns!
Common Mistakes
Drawing a ruffle skirt can be challenging. Many common mistakes can make your drawing look unrealistic. Here, we will discuss two major pitfalls: avoiding flat ruffles and balancing proportions.
Avoiding Flat Ruffles
One common mistake is drawing flat ruffles. Ruffles should have depth and dimension. To avoid this mistake, follow these tips:
- Use curved lines instead of straight lines.
- Vary the length of each ruffle.
- Add shading to create depth.
Observe real-life ruffles. Notice how they fold and overlap. Practice by sketching different types of ruffles. This will help you understand their structure better.
Balancing Proportions
Another common mistake is not balancing proportions. Ruffles should be proportional to the skirt. Here’s how to achieve this:
- Start with a basic skirt outline.
- Divide the skirt into equal sections.
- Add ruffles to each section, keeping them consistent.
Use a ruler to measure equal sections if needed. This ensures your ruffles are balanced and look natural.
| Common Mistake | How to Fix |
|---|---|
| Flat ruffles | Use curved lines and add shading. |
| Unbalanced proportions | Divide the skirt into equal sections. |
By avoiding these common mistakes, your ruffle skirt drawings will improve. Remember to practice and observe real-life examples.

Credit: fashion-incubator.com
Conclusion
Drawing a ruffle skirt is a fun and rewarding experience. Follow these simple steps to create stunning designs. Practice regularly to improve your skills. Share your creations with friends and family. Enjoy the process and let your creativity shine. Happy drawing!


Leave a Reply